
NOTE: The most recent version of this howto, for oVirt 4.1, lives HERE.
As a fan both of x86 virtualization and of open source software, I long wondered when the “Linux of virtualization” would emerge. Maybe I should say instead, the GNU/Linux of virtualization, because I’m talking about more than just a kernel for virtualization — we’ve had those for a while now, in the forms of Xen and of KVM. Rather, I’ve been looking for the virtualization project that’ll do to VMware’s vSphere what Linux-based operating systems have done to proprietary OS incumbents: shake up the market, stoke innovation, and place the technology in many more people’s hands.
Now, I may just be biased — I work for one of the companies trying to give this technology away to those who want it (and sell it to those who’re looking for support) — but the time for that Linux of virtualization is has finally come. Last week, the oVirt Project shipped its first release since the source code for the project’s Java-based management server went public last November. After having toiled through building and configuring oVirt back in November, I’m happy to report that the process has gotten much much simpler. Plenty of work remains to be done, particularly around supporting multiple Linux distributions. However, if you have a reasonably beefy machine to test with, you can be up and running in no time. Here’s a step-by-step guide to installing a single server oVirt test rig:
Step one, get a machine with Intel VT or AMD-V hardware extensions, and at least 4GB of RAM. As with all virtualization, the more RAM you have, the better, but 4GB will do for a test rig.
Step two, grab a Fedora 16 x86_64 install disc and install Fedora. Also, you’ll want to have a client system capable of accessing the spice-based console of your VM–for now, Fedora’s your best there as well. (update: I did some spice-xpi packaging for Ubuntu 11:10 and openSUSE 12.1) You can access oVirt systems via VNC, as well, though that path is rougher around the edges right now.
(An aside: right now, oVirt is most closely aligned with Fedora, as the only current downstream distribution is Red Hat’s RHEV. However, getting oVirt into as many distros as possible is a priority for the project, so let’s hurry up and install this so we can get to work on Ubuntufication and openSUSEification and whatnot!)
For my Fedora 16 test machine, I went with the minimal install option, and got rid of the separate /home partition that the Fedora installer creates by default, leaving that space instead to the root partition. For networking, I stuck to dhcp.
After installing F16, start the network, set it to start in the future by default, and see what your IP address is:
service network start && chkconfig network on && ifconfig -a
From there, ssh into your machine, where it’s easier to cut and paste directions from the Web. Since I installed my system from the Fedora DVD, I yum update to install the ~79 updates that have been released since. (And remind myself for the 1000th time to look into creating a local Fedora repository)
Next, install wget (the minimal install doesn’t come with it) and grab the repository file for oVirt Stable:
yum install -y wget && wget http://www.ovirt.org/releases/stable/fedora/16/ovirt-engine.repo -P /etc/yum.repos.d/
(I’ve been setting up my test installs using the root user, if you’re logged in as a regular user, use sudo as needed)
Then, install ovirt-engine, the management server for oVirt:
yum install -y ovirt-engine
(on my minimal install, this step pulled in 100 packages)
Next, run the setup script for oVirt Engine, cleverly tucked away under the name:
engine-setup
The script asks a series of questions, and it’s safe to stick with the defaults. The script will ask for your machine’s fully-qualified domain name, and suggest its host name by default. If the name doesn’t resolve properly, the script will ask if you’re sure you want to proceed. It’s OK to proceed anyway — if you run into trouble you can work around it by modifying /etc/hosts, and for this single server config, well, your server knows where to find itself. Choose NFS as the default storage type, and let the script create an NFS iso share for you. I chose the path /mnt/iso and name ‘iso’

Type yes to proceed. When the script finishes, it’ll tell you where to reach the ovirt web interface, at port 8080 or 8443 of your management server. Before we head over there, though, let’s do a bit more storage configuration.
In keeping with the all-in-one theme of this walkthrough, we’re going to create three nfs shares on our management server: one for hosting the iso images from which we’ll install VMs; one for hosting our VMs’ hard disk images; and one for hosting a location to which we can export VMs images we may want to move between data domains. If you let the engine-setup script create an nfs share for you, you’ll see this line in /etc/exports:
/mnt/iso 0.0.0.0/0.0.0.0(rw) #rhev installer
Create two more like it:
/mnt/data 0.0.0.0/0.0.0.0(rw)
/mnt/export 0.0.0.0/0.0.0.0(rw)
Then head over to /mnt to create the data and export directories:
cd /mnt && mkdir data export
All three of our storage folders need to be owned by user vdsm and group kvm. The iso folder that the engine-setup script created is already owned by vdsm:kvm — the data and export directories we created need to match that:
chown vdsm:kvm data export
Another NFS configuration bit here. oVirt wants to mount its NFS shares in v3, not v4. You can ensure this either by disabling nfs v4 on the server side or on the client side, as described in the oVirt wiki, here. I’ve been disabling NFSv4 on my ovirt-engine boxes by adding this line to /etc/sysconfig/nfs, and then restarting the service:
NFS4_SUPPORT="no"

systemctl restart nfs-server.service
Now we have a oVirt Engine management server and three NFS shares, and we’re ready to add a host to handle the compute. Since this is a single-box install, we’re going to configure our management server as a virtualization host. This step is based on the wiki page at http://www.ovirt.org/wiki/Installing_VDSM_from_rpm. First, we install bridge-utils and create a network bridge:
yum install -y bridge-utils

vi /etc/sysconfig/network-scripts/ifcfg-ovirtmgmt
This is the contents of my bridge config file:
DEVICE=ovirtmgmt
TYPE=Bridge
ONBOOT=yes
DELAY=0
BOOTPROTO=dhcp
NM_CONTROLLED="no"
Then, to the config file for my network adapter, I add the line:
BRIDGE=ovirtmgmt
And then, restart the network:
service network restart
(Again, this is on my minimal install. If you’re using a Fedora machine with NetworkManager enabled, you should also disable NM. Check the wiki for more info.)
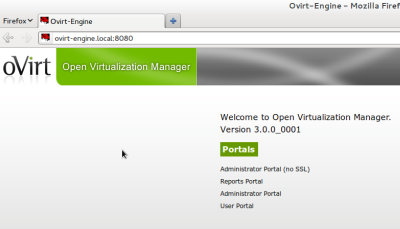
Now let’s hit the oVirt Engine administrator portal, at :8080 or 8443. If your server’s host name doesn’t resolve properly, you can add an entry in the /etc/hosts file of your client to route you in the right direction. Here’s what you should see:
Click one of the administrator portal links, log in with the user name “admin” and the password you gave the engine-setup script. Once you’re logged in, click the “Hosts” tab, then click “New” to add a host. Give your host a name, and enter it’s address or host name, and the machine’s root password:

Once you click OK, a dialog box will inform you that you’ve not configured power management–that’s all right, just click through that.
Now, at the bottom of the screen, you can click on the up/down arrows next to “Events” to expand the events dialog and watch your management server configure itself as a host. You’ll see your server ssh in to itself, and run a bootstrap script that will install everything it needs. The last step in the script reboots the script, so if you click back to check on your progress and see “Error: A Request to the Server failed with the following Status Code: 0” that’s probably a good sign. :) (If something goes wrong during the process, you’ll see in this events area. If the event tells you to look at the log, start with the engine log at /var/logs/ovirt-engine/engine.log. Hopefully, the process will just crank to completion without incident.)
Once your server comes back from it’s reboot, you ought to be able to log in to the admin portal, click on “Hosts,” and see a happy green arrow indicating that your host is Up. Once your host is up, it’s time to hook up our storage. Click the “Storage” tab, then “New Domain.”
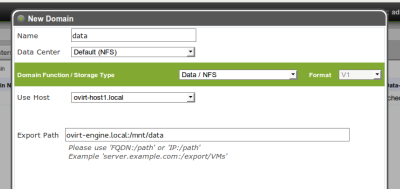
Give your new data domain a name (I go with “data”), choose your host from the drop-down box, and then enter the address and mount point of your NFS data share in the “Export Path” field, and click OK. Your server should mount the share and, shortly, you should see another happy green Up arrow next to your data domain.
An oVirt data center needs an active data domain before you can attach or add iso or export domains, which is why the iso domain that the engine-setup script creates starts out unattached. With your data domain in the green, you can click on that iso share, and then, in the pane that appears below the domains list, click the Data Center tab, then “Attach,” and choose your default data center to attach the iso domain to. Next, click the “Default” entry in that same pane, and “Activate.”
Adding the export domain works in just the same way as adding the data domain, just make sure that you choose the export option from the “Domain Function / Storage Type” drop down menu.
Now, let’s add an iso image from which to install a VM. We do this from the command line, using the tool, engine-iso-uploader. On my test systems, I’ve used wget to fetch an iso image (in this example, the Fedora net install image) from the Internet to my oVirt Engine machine. From the directory where I’ve downloaded the image, I issue the command:
engine-iso-uploader -i iso upload Fedora-16-x86_64-netinst.iso
The tool asks me for my admin password, the same one I use to log in to the web console, and starts uploading the image to my iso domain, which I’ve named “iso.” (For more engine-iso-uploader guidance, see “man engine-iso-uploader”)
Once the upload is finished, I’m ready to create my VM. Click the virtual machines tab in the web admin, click new desktop (or server), give the machine a name, set the memory size, and adjust the cores, if you want. The OS list is limited right now to the RHEL and Windows options officially supported by RHEV, but I’ve installed Fedora, Ubuntu and Windows 8 without any trouble. For my F16 install, I chose RHEL 6.x x86_64 from the list:

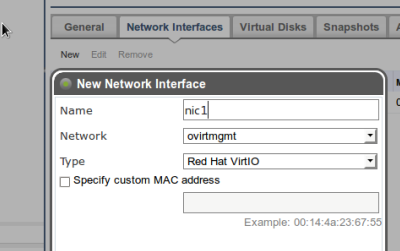
After clicking OK in the new VM dialog, click on your new machine in the VM list, and in the secondary pane that appears below, give the VM a network interface clicking on Network Interfaces, then New, then OK:
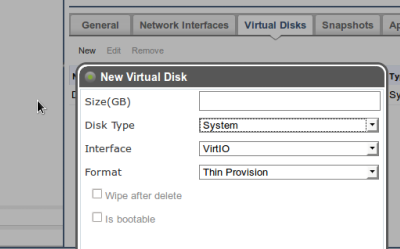
 In the same way, give your VM a disk by clicking on Virtual Disks, New, enter a size, then OK:
We’re ready to install our VM. With your VM selected, click the “Run Once” button, attach your install CD, bump up cd-rom in the boot sequence, and click OK:

In order to access the console of our new VM, we’re going to need to install the Firefox extension for spice. From a Fedora 16 machine with Firefox installed, you can install the spice package with:
yum install -y spice-xpi
You may need to restart Firefox after installing the spice plugin, but once you’re up and running with it, you’ll be able to right-click on your VM and click “Console,” which will bring up the spice console for your machine. From here, install your OS normally. In the spice console, you can hit Shift-F11 to enter/exit full screen mode, and Shift-12 to release your pointer if the console has captured it.
The configuration changes you make in the “Run Once” dialog are supposed to last just once, but I’ve found that they persist until you actually shut down the machine–rebooting it once your install is complete isn’t enough.
I think that’s it — we have an all-in-one oVirt test box, complete with NFS storage and a guest machine. From here, you can add additional hosts, based on other Fedora hosts or on the project’s stripped-down oVirt Node image. You can point your additional hosts at the NFS shares we created in this runthrough, or you can add new storage domains. Consult the oVirt Installation guide for more information on installing and configuring your oVirt environments. That’s enough for this blog post, check back soon for more material on oVirt, and if you’re interested in getting involved with the project, you can find all the mailing list, issue tracker, source repository, and wiki information you need here. On IRC, I’m jbrooks, ping me in the #ovirt room on OFTC or write a comment below and I’ll be happy to help you get up and running or get pointed in the right direction.

38 responses to “How to Get Up and Running with oVirt”
Hi,
Following steps above,when i finish step 14,i got the error message “Error: A Request to the Server failed with the following Status Code: 0″,and then the server reboot.
But the server can not reboot normally,and it stop in showing fedora logo page for long time(see as pic “reboot_question.jpg”),so i force reboot it and log in as root.when log in,i run ifconfig command and see no ip addr(before adding host it has ip addr 192.168.0.240). And i found ther bridge ovirtmgmt is down,so i run ifup ovirtmgmt command to active the bridge,and it works.
Then i log in to the admin portal, click on “Hosts,” and see a red arrow indicating that the host is not up,with status “Non Responsive”.
Can help me to explain what happend? Thinks in advanced.
p.s.
The oVirt Engine using static IP Addr(192.168.0.240),not dhcp.Does this cause it?
LikeLike
Can you show me what your ifcfg-em1 (or whatever your physical adapter is named) and ifcfg-ovirtmgmt look like? Static IP is fine.
LikeLike
# more /etc/sysconfig/network-scripts/ifcfg-ovirtmgmt
DEVICE=ovirtmgmt
TYPE=Bridge
ONBOOT=yes
DELAY=0
NM_CONTROLLED=no
IPV6INIT=no
USERCTL=no
DNS1=192.168.0.1
IPADDR=192.168.0.240
PREFIX=24
ONBOOT=no
NETMASK=255.255.255.0
BOOTPROTO=none
GATEWAY=192.168.0.1
# more /etc/sysconfig/network-scripts/ifcfg-p10p1
DEVICE=p10p1
ONBOOT=yes
BOOTPROTO=none
HWADDR=1c:6f:65:a6:d2:90
BRIDGE=ovirtmgmt
NM_CONTROLLED=no
IPADDR=192.168.0.240
NETMASK=255.255.255.0
TYPE=Ethernet
GATEWAY=192.168.0.1
DNS1=192.168.0.1
IPV6INIT=no
USERCTL=no
PREFIX=24
LikeLike
In your script ifcfg-p10p1, remove all the lines after NM_CONTROLLED — this adapter doesn’t get an IP address of its own, it connects through the bridge.
LikeLike
I try this,and it works,thanks very much.
LikeLike
When I try to run yum install -y ovirt-engine I get the message: No package ovirt-engine available. Error: Nothing to do
How do I solve this?
LikeLike
Hi Paul, make sure that you’ve done step six, where you download the repo file for ovirt.
LikeLike
Hey Jason, nice writeup. We’re trying to get a little testbox going here at work, and have it mostly up and running. However, I’m getting some abysmal performance trying to install anything. I’m presuming it’s the NFS connections for the ISO domain, which is local to the machine.
I added the NFS4_SUPPORT=”no” to the /etc/sysconfig/nfs file, but when I run a mount, I’m still seeing:
ovirtm.company.local:/ovirt/images/ on /rhev/data-center/mnt/ovirtm.company.local:_ovirt_images type nfs4 (rw,relatime,vers=4,rsize=524288,wsize=524288,namlen=255,soft,nosharecache,proto=tcp,port=0,timeo=600,retrans=6,sec=sys,clientaddr=10.10.23.100,minorversion=0,local_lock=none,addr=10.10.23.100)
I’m concerned by the “type nfs4” in there. Any ideas? My experience with NFS is minimal, so I have no idea if v4 support was successfully disabled or not, or whether that has anything at all to do with the crappy performance.
LikeLike
That NFS4 issue would stop the domain from being added correctly in the first place. Performance isn’t going to be stellar, but I’ve had decent performance on the installs I’ve used. I wonder what else it could be…
LikeLike
Thought it may have been a low-RAM scenario, but even after cranking the RAM up to 8GB on the host, the copying speed doesn’t seem to be much better. Not sure exactly where the issue lies, since, also over NFS, booting up from the virtual disk seems perfectly normal, but utilizing the ISOs is incredibly slow (fedora minimal install took over an hour). Might try moving to the ISO domain to an external device and see if that fares any better. If so, I’ll drop a note here.
LikeLike
I have yet to try the external data sources for either the datacenter data store, or the ISO store, but I wanted to drop a note here that I’ve managed to achieve workable speeds by setting up the Master Data store’s export as (rw,async,no_wdelay). I can imagine you wouldn’t want this for an external storage box/device, but internally I can’t see any issue with the async. I haven’t seen any difference between having or not having wdelay, so I’ll probably just drop that.
LikeLike
Hi Jason,
Following the steps above,i create a virtual machine,and ready to install my VM.With the VM selected,i click the “Run Once” button,but after a little while,the VM is still with status ‘Down’,and i could see the err message as following:
2012-Feb-21, 09:41:29
Failed to run VM fc2 (User: admin@internal).
2012-Feb-21, 09:41:29
Failed to run VM fc2 on Host host241.
2012-Feb-21, 09:41:29
VM fc2 is down. Exit message unable to open disk path /rhev/data-center/f2c2c3f4-08ee-40c6-9539-748e48e6b5ed/e1ba59cc-e695-4e63-83a9-2e7c7a934829/images/c7e7b436-cc80-492e-a0ba-0a9c4fb13b03/ce04fc46-b427-4190-b313-c652e6596722: Permission denied.
2012-Feb-21, 09:41:28
VM fc2 was started by admin@internal (Host: host241).
Can help me about this issue?
Thanks in Advance. Please let me know if you need more information.
p.s.
host241 is a separate host machine from engine machine.
LikeLike
This sounds a bit like an selinux-related issue someone on the ovirt user list had: http://lists.ovirt.org/pipermail/users/2012-February/000579.html
Check the result of: “getsebool virt_use_nfs” on your host machine. If it’s set to off, you can set it to on with “sudo setsebool virt_use_nfs on” — see if that helps. Either way, please let me know — if there’s a bug here I’d like to make sure we squash it!
LikeLike
On the host,it seems the selinux‘s sets is ok,see that:
# getsebool virt_use_nfs
virt_use_nfs –> on
When i choose the VM to run on the host240(host240 which is the eigine itself),it started normally。
Anything other to help to solove this issue,thanks in advance.
LikeLike
All right — just to confirm, you checked that selinux setting on host241?
Have a look at http://www.ovirt.org/wiki/Troubleshooting_NFS_Storage_Issues, which contains some info on nfs storage issues.
LikeLike
Yes,i set the selinux setting on host241(not engine).
And following the http://www.ovirt.org/wiki/Troubleshooting_NFS_Storage_Issues,
i check that:
————————————————————–
1.Engine(host240)
# vi /etc/nfsmount.conf
Nfsvers=3
# vi /etc/sysconfig/nfs
NFS4_SUPPORT=”no”
# ‘/mnt/iso’ is iso storage domain
# ll -d /mnt/iso
drwxr-xr-x 3 vdsm kvm 4096 2月 22 10:28 /mnt/iso
# vi /etc/exports
/root/work/ovirt-iso 0.0.0.0/0.0.0.0(rw)
/root/work/ovirt-iso 192.168.0.241(insecure,rw,sync,no_root_squash)
/root/work/ovirt_iso 0.0.0.0/0.0.0.0(rw) #rhev installer
/mnt/data 0.0.0.0/0.0.0.0(rw)
/mnt/data2 0.0.0.0/0.0.0.0(rw)
/mnt/export 0.0.0.0/0.0.0.0(rw)
/mnt/iso 0.0.0.0/0.0.0.0(rw,anonuid=36,anongid=36)
And my dc use ‘/mnt/data2′,’/mnt/export’,’/mnt/iso’ as storage domain.
# service netfs status
活跃 NFS 挂载点:
/rhev/data-center/mnt/192.168.0.240:_mnt_iso/
rhev/data-center/mnt/192.168.0.240:_mnt_export/
rhev/data-center/mnt/192.168.0.240:_mnt_data2
# showmount -e 192.168.0.240
Export list for 192.168.0.240:
/mnt/iso 0.0.0.0/0.0.0.0
/mnt/export 0.0.0.0/0.0.0.0
/mnt/data2 0.0.0.0/0.0.0.0
/mnt/data 0.0.0.0/0.0.0.0
/root/work/ovirt_iso 0.0.0.0/0.0.0.0
/root/work/ovirt-iso 192.168.0.241,0.0.0.0/0.0.0.0
# getsebool -a | grep virt_use_nfs
getsebool: SELinux is disabled
P.S.
On engine host,i disabled the selinux as following:
# vi /etc/sysconfig/
selinuxSELINUX=disabled
——————————————————————
2.Host(host241)
# getsebool -a | grep virt_use_nfs
virt_use_nfs –> on
# showmount -e 192.168.0.240
Export list for 192.168.0.240:
/mnt/iso 0.0.0.0/0.0.0.0
/mnt/export 0.0.0.0/0.0.0.0
/mnt/data2 0.0.0.0/0.0.0.0
/mnt/data 0.0.0.0/0.0.0.0
/root/work/ovirt_iso 0.0.0.0/0.0.0.0
/root/work/ovirt-iso 192.168.0.241,0.0.0.0/0.0.0.0
# mkdir /tmp/iso
# mount -t nfs 192.168.0.240:/mnt/iso /tmp/iso
# cd /tmp/iso
# ll
total 4drwxr-xr-x 4 vdsm kvm 4096 Feb 17 16:14 4cee1a12-84ce-4b78-ab20-caddfa707b0b
It seems that mounting the engine’s iso storage domain to the host works fine.
————————————————————————
With the setting above,i start VM in admin portal and still get err message as following:
2012-Feb-22, 10:56:51 Failed to run VM FC16 (User: admin@internal).
2012-Feb-22, 10:56:51 Failed to run VM FC16 on Host host241.
2012-Feb-22, 10:56:50 VM FC16 is down. Exit message unable to open disk path /rhev/data-center/f2c2c3f4-08ee-40c6-9539-748e48e6b5ed/e1ba59cc-e695-4e63-83a9-2e7c7a934829/images/ee828e8b-7cd9-4c69-ac68-9fc4d3cba968/83962373-ae6d-4f81-b3f7-1689ec6e1174: Permission denied.
2012-Feb-22, 10:56:48 VM FC16 was started by admin@internal (Host: host241).
LikeLike
Hmm — is the denied storage domain the iso domain, or is it the data domain? All your NFS shares need the 36:36 chown-ership referenced in the wiki. There’s also an nfs-check script for locating config issues that might help: http://gerrit.ovirt.org/gitweb?p=vdsm.git;a=commitdiff;h=578cfe90239d5c3f6f11f1fc063c148606e991dc
LikeLike
Thanks so much – wonderful post. I knew I wanted to use oVirt but there’s really no concise “how to get started” document on the site – this should really be linked on ovirt.org.
I have the Engine up and running on FC16, and a VM running, but I’m having spice problems. Everything else seem to work fine, but when I try to view console through the Admin web UI (SSL), the spice window pops up and then goes away. I also tried with ovirt-shell on my desktop, connecting and running “console “, but it fails as well, with spicec.log showing “RedPeer::connect_to_peer: Connect failed: Connection refused (111)” when started through XPI, or “main: Spice client terminated (exitcode = 13)” when started through ovirt-shell.Any ideas?Thanks,Jason Antmanhttp://blog.jasonantman.com
LikeLike
Thansk Jason – Ovirt now up and running. For Spice console access to the VM from a windows client is the Spice ActiveX plugin supposed to work with this release?
LikeLike
I’m not sure about the Windows access story, I’m trying to nail that down. Do you have a Windows system with the Spice ActiveX plugin to test with?
LikeLike
Trying to track down where to get the SpiceActiveX plugin from! Tried 32bit IE8 on a 32bit Windows 7 but the activeX doesn’t install.
LikeLike
I tried grabbing the ActiveX spice plugin from our RHEV 2.2 environment, but that didn’t work.
LikeLike
Hi guys,
have the same problem with windows IE9. I see no prompt to install spice-activex plugin when press console button first time.
Before ovirt I install rhev 3, and console work!
LikeLike
Hey Jason!
Fabulous post! I am a Windows point n click admin – how do I edit the config file for my network?
LikeLike
Hey Riff — what step are you on?
LikeLike
editing the config file for my network adapter.
and also, once i create the bridge i am not able to access the LAN…?
LikeLike
If you’re setting it up on a single host, like I’m describing in here, the two files you’ll need to edit are: /etc/sysconfig/network-scripts/ifcfg-ovirtmgmt and /etc/sysconfig/network-scripts/ifcfg-em1 (assuming your nic is named em1). You’ll need to be root to edit these files. You can use any text editor.
If you want to edit these files from a windows client, you can use putty to ssh to the linux host.
LikeLike
Thanks Jason; I ended up installing the node on a separate box and was able to get the node-engine to talk.
Running into a strange problem creating the storage.. the engine is not able to find /mnt/data even though it exists and I gave the engine permissions to modify it…
The weird thing: even as the root I am not able to navigate to the two shares: export and data… even though they show up when I list them…
LikeLike
The wiki page at http://www.ovirt.org/wiki/Troubleshooting_NFS_Storage_Issues might help sorting this out
LikeLike
Thanks. I haven’t installed oVirt on CentOS yet, but the oVirt Engine installation I’ve described here can be used to manage multiple hosts. I have tried this.
LikeLike
Hi Jason,
Is oVirt 3 use IPA as directory service? I could not find “ipa” command after ther oVirt installation.
I try insert a new user(such as “test1”) into the “users” table,and i can find it in Administrator Portal from “Users” tab.When i click “Add” button,it open “Add Users and Groups” dialog,and the new user does not appearance in the seraching result.
So,how can i add new users?
Thanks in anvance.
LikeLike
You can use IPA with oVirt, but it doesn’t get installed automatically. I haven’t tried it yet myself — I’ll look around for a link on creating users with it. I know I’ve seen it somewhere…
LikeLike
So,the ovirt engine use db to store users? If so,where is the password come from? I can find only user_name in the table users.
LikeLike
The password is not stored within oVirt. The user authenticates to Active Directory / IPA / other LDAP server, not to oVirt.
LikeLike
Were you able to find that link that explains how to use IPA with Ovirt? I have the IPA server set up but it doesn’t let me add the domain with the engine-manage-domains tool. I get the error that authentication failed.
LikeLike
so Do I can add user as local user ? Or Do I need install IPA to add new user..
I need some user to have acces only on user panel with control of vm.
LikeLike
Hello Jason,
I sucessfully install Ovirt, but when I restart my fedora, I can not access Ovirt from Web Based because it was not started, I don´t know how to start Ovirt service, can you help me out?
LikeLike
Tested successfully on CentOS 6.2 (manager and host)
I used the package kindly provided by http://www.dreyou.org/ovirt/
I just had to tweak the DB to allow VM to run on CentOS host :
psql -U postgres engine -c “update vdc_options set option_value=’rhel6.2.0′ where option_name LIKE ‘EmulatedMachine’;”
LikeLike