
I enabled the fediverse integration on my wordpress blog, and I’m wondering how it works.
-
Last year at around this time I wrote a post about how I hadn’t been writing posts lately, and how I wondered whether it made sense to re-up my wordpress.com subscription, and how I went ahead and re-upped it anyway. I went on to talk about a few of the things I might blog about, driven on by that re-upping, and by having written about potentially writing about those things.
Well, I didn’t write any more posts in the twelve months that followed, and yet I just paid for another year of wordpress.com.
I mentioned that I would be writing, potentially, about ceph and kubevirt and openshift, and I didn’t write about those topics, mostly because I spent less time playing with those projects than I thought I would. I do have some server blades loaded up with openshift and ceph-rook and kubevirt, but that cluster dates back to a couple of years ago, when openshift v4 was new, and bare metal installs weren’t as well supported. I’ve been meaning to find the time to start fresh with it.
I’ve also been thinking about writing up my thoughts on the Great Highway|Walkway controversy that’s been going on around here in recent months. Maybe I will. Otherwise, see you next year.
-
My annual resubscription to this wordpress.com instance has come and gone again, and, as in the previous few years, I thought:
“Should I renew?
“Well, you still want to have a blog, even if you don’t, uh, write blog posts.”
“But what about how I always get annoyed with wordpress, and always want to Blog Like a Hacker?”
“You set all that up already, remember, with git and everything, and then set it up again, and you still weren’t writing blog posts.”
“True. So, should I renew?”
“Well, you may start blogging again, and you’re supporting open source software, so, yeah, renew.”
— me, paraphrasedAnd renew I did. Now that I’m here, I’m playing around with what’s changed in WordPress, trying to give blocks a chance, etc. But, I do have some actual new things I figure I’d like to blog about, topics that hearken back to when I used to blog a bit more frequently.
Eight or so years ago, I started spending a bunch of time with oVirt, an open source virtualization platform that I could use to run VMs for running services and testing various things. This led me to spending a bunch of time with Gluster, an open source storage platform that I could use to provide the shared storage that my VMs needed to run and stay running as they moved from one oVirt host to another.
Over the past year-plus, I’ve been spending time with a new set of projects for providing VMs and storage, and a lot more: OpenShift, Kubevirt, Rook and Ceph. So, that’s what I intend to write some blog posts about.
We’ll see if saying I’d do it here leads to me doing it. ;)
-
I recently wrote about getting up and running with kubeadm and Fedora CoreOS, which I got working, but which sent me into a miniature funk of uncertainly over various little integration issues.
First, I was getting around the lack of support in rpm-ostree for rpms that place stuff in
/opt, which isn’t a traditional place for package managers to put stuff, but which is where kubeadm puts its cni binaries, for historical reasons. I got the Fedora package that provides the cni binaries, containernetworking-plugins, and that doesn’t stick things into/opt, modified to say it provides kubernetes-cni, which is what the upstream kubernetes rpm maintainers call it, but I had to transgress against rpmlint by leaving out the version number. The upstream packagers call explicitly for cni version 0.6.0, while Fedora is shipping version 0.7.4.As far as I could tell, the later version worked just fine, but I wasn’t sure I’d get my package change merged while telling that lie of omission. That led me to wonder about whether I should try to convince the upstream packagers to move the cni binaries — kubernetes is hard coded to look for them in opt, but you can specify a different location when you’re setting things up, so getting the binaries moved to
/usr/libexec/cni, where Fedora keeps them, could be an option. Or, I’ve played with some symlink-type trickery in the past to make cni binaries appear under/optwhile actually installed elsewhere, so maybe I could convince the project to accept something like that.However, Fedora’s cri-o package depends on at least cni 0.7.x, so achieving nicer (or, failing that, trickier) kubernetes-cni packaging to allow for installation on rpm-ostree hosts would mean incompatibility with the runtime I was interested in using, so what’s the point of anything, anyway, even?
Well, my change did get merged to the Fedora package (you can test the package and give it karma) and those newer cni binaries do appear to work just fine with the upstream kubelet, so I’m feeling somewhat better about that part. Also, I think I agreed to co-maintain the containernetworking-plugins package moving forward, so that’s fun.
Elsewhere on the problematic networking front, I had to insert this puzzled passage into my last post:
…I found during my tests that my Fedora CoreOS host was configuring a
10.88.0.1/16address on thecni0interface, which was conflicting with my flannel networking. I found that if I deleted that address from the device, thecni0interface would get a new,10.244.0.1/24address that worked for my cluster:sudo ip addr del 10.88.0.1/16 dev cni0I wasn’t sure where that was coming from, though I had some vague sense that I once knew the answer. I relearned / remembered that this is part of the config for cri-o, and lives in the file
/etc/cni/net.d/100-crio-bridge.conf, but then disappears, seemingly following the next reboot after I’ve configured a cluster. I thought that perhaps I should be passing10.88.0.1/16as the cidr argument when running kubeadm init, instead of the conventional10.244.0.1/16, but maybe not. I need to do more poking here.Speaking of reboots, I ran into a problem in which cri-o wasn’t dealing very well with reboots — as expected, all the containers running under cri-o were going away during a reboot, but this should be no big deal, because kubernetes can restart its control plane containers from kubelet manifest files, and start up anything else from its records in etcd. I found, though, that following a reboot, the kubelet was complaining about how a sandbox for the pod it was trying to run already existed, even though cri-o wasn’t running any pods. I found a reported issue that looked similar and contained a workaround, but ended up solving the issue by figuring out how to update cri-o to a later version…
One of qualities that sets cri-o apart from other kubernetes container runtime options is that each cri-o version is pegged to a particular kubernetes version — there’s a cri-o 1.12 for kubernetes 1.12, a 1.13 for 1.13, and so on. As I write this, the latest upstream version of kubernetes is 1.13.4, and that’s the version of the kubelet, kubectl and kubeadm I’ve been running on my Fedora test VMs. However, the current version of cri-o shipping with Fedora is 1.12.0. It seemed to be working (that reboot issue notwithstanding), but I wanted to be running 1.13.
Poking around in Fedora’s updates system, I found that cri-o 1.13 was available as a test package, but was now being packaged as a Fedora module. Fedora Modularity is a big topic, but the bottom line is that it allows for more flexibility in packaging and maintaining software in the Fedora family. In this case, it offers a way out of the one stable version per Fedora release that doesn’t fit well with packages like cri-o, which will have multiple stable versions out in the world at once. The trouble, potentially, was that I wasn’t sure whether module-based rpms would play nicely with rpm-ostree and package layering.
As it turned out, I simply had to enable the repo by changing
enabled=0toenabled=1in/etc/yum.repos.d/fedora-updates-testing-modular.repo(moving forward, I’d like to see rpm-ostree grow support for enabling repos per-operation, a la yum and dnf), and then install the package usingrpm-ostree install cri-o. On the test host I was already using, where I’d already installed cri-o, I had to take another step — I should have been able to runrpm-ostree upgrade -rto fetch any available image updates alongside any updates to my layered packages, but since Fedora CoreOS is still in experimental preview mode, its configured ostree remote doesn’t point anywhere, which leads rpm-ostree upgrade to error out before grabbing any layered package upgrades. Instead, I had to runrpm-ostree uninstall cri-o && rpm-ostree install cri-oto uninstall and then reinstall the newer version.I tested out a kubeadm cluster with the updated cri-o, and it worked, so I left some karma for the package. When I started typing up my notes about the reboot issue, I figured I’d reboot again to see if the new version was behaving the same way, and the problem disappeared. I don’t know if something about the mismatch between kube 1.13 and cri-o 1.12 was to blame, but I was happy not to see the issue any more.
Next up, I want to play with the HA kubeam docs — I’m thinking I’ll set up a three master/etcd node, three worker node cluster on one of my oVirt clusters, team it up with the oVirt volume provisioner and flexvolume driver for persistent volume support, and then install KubeVirt with nested kvm for some tests of that. I’m interested to see how this Fedora CoreOS / kubeadm cluster fares over time through some package and image upgrades while running some longish-lived workloads. Since the ostree repo isn’t up yet during the experimental preview, I suppose I’ll be sprucing up these BYOAtomic docs to compose and host my own repo.
Stay tuned.
-
There are many different ways to bring up a Kubernetes cluster, but the simplest option I’ve found for getting up and running with a single or multi-node cluster involves a tool called kubeadm, for which the Kubernetes project maintains good installation and configuration docs.
These docs include directions for hosts running Debian/Ubuntu, RHEL/CentOS and Container Linux, but the host I’m interested in is Fedora CoreOS — the successor project to Container Linux and Fedora Atomic, which is currently available as an experimental preview.
Now, the Container Linux directions do work for Fedora CoreOS. In fact, since these steps simply involve copying binaries and systemd unit files onto the host, they’d likely work for any sort of Linux host.
The Debian/Ubuntu and RHEL/CentOS directions involve deb and rpm software packages, which are maintained by the Kubernetes project. As with software packages more generally, these debs and rpms cut out some of the installation steps, handle dependencies, and offer a mechanism for future updates, so I prefer to use them.
As with Container Linux and Fedora Atomic Host, Fedora CoreOS ships system and library dependencies in a (more or less) immutable image, and is meant to host applications running in containers. However, Fedora CoreOS images are assembled using the tool rpm-ostree, which does allow for additional rpms to be layered atop the the base image.
That’s why, with a little bit of modification, the RHEL/CentOS kubeadm installation steps can be made to work with Fedora CoreOS, too.
The upstream kubeadm installation directions for RHEL/CentOS begin by configuring a yum repository:
sudo tee /etc/yum.repos.d/kubernetes.repo <<EOF
[kubernetes]
name=Kubernetes
baseurl=https://packages.cloud.google.com/yum/repos/kubernetes-el7-x86_64
enabled=1
gpgcheck=1
repo_gpgcheck=1
gpgkey=https://packages.cloud.google.com/yum/doc/yum-key.gpg https://packages.cloud.google.com/yum/doc/rpm-package-key.gpg
exclude=kube*
EOF
One of the dependencies for the upstream kubelet package is a set of container networking plugins, which the kubernetes project also packages, under the name kubernetes-cni. Unfortunately, their package places these binaries under
/opt, which rpm-ostree will not abide. Fedora CoreOS already includes these cni binaries in its base image, but under the name containernetworking-plugins.I’ve made an alternate version of this package that’s modified to report that it satisfies the kubernetes-cni requirement. I’ve submitted a pull request to get this change included in Fedora’s containernetworking-plugins package — if it gets merged I’ll be able to delete this step. Until then, let’s view this as an opportunity to see rpm-ostree’s facility for replacing specific packages in the base image with alternatives:
sudo rpm-ostree override replace https://copr-be.cloud.fedoraproject.org/results/jasonbrooks/containernetworking-cni/fedora-29-x86_64/00861706-containernetworking-plugins/containernetworking-plugins-0.7.4-1.fc29.x86_64.rpm
Next, we’ll use package layering to install the kubelet, kubeadm and kubectl binaries. I’m also installing cri-o here, because that’s the runtime I’m interested in using with kubernetes. I’m tacking an
-ronto the end of this command to reboot my host, which is necessary for the replace and install layering operations to take effect.sudo rpm-ostree install cri-o kubelet kubectl kubeadm -r
Once we’ve installed our layered packages, they’ll be updated alongside the regular image updates for our Fedora CoreOS host. If you’d rather update these packages manually, you need to edit their repo files under
/etc/yum.repos.d/to changeenabled=1toenabled=0.Since we’re using cri-o as our runtime interface, we need to manually set the correct cgroup driver:
echo "KUBELET_EXTRA_ARGS=--cgroup-driver=systemd" | sudo tee /etc/sysconfig/kubelet
SELinux can be troublesome to configure correctly, and upstream kubeadm docs deal with the issue by throwing SELinux into permissive mode. I’ve found that kubeadm runs quite happily in SELinux enforcing mode, if you pre-create a few directories and set their contexts appropriately:
for i in {/var/lib/etcd,/etc/kubernetes/pki,/etc/kubernetes/pki/etcd,/etc/cni/net.d}; do sudo mkdir -p $i && sudo chcon -Rt svirt_sandbox_file_t $i; doneAlso required for cri-o are the following sysctl parameters and kernel modules, which we’ll set and configure to persist across reboots:
sudo modprobe overlay && sudo modprobe br_netfilter

sudo tee /etc/modules-load.d/crio-net.conf <<EOF
overlay
br_netfilter
EOF

sudo tee /etc/sysctl.d/99-kubernetes-cri.conf <<EOF
net.bridge.bridge-nf-call-iptables  = 1
net.ipv4.ip_forward                 = 1
net.bridge.bridge-nf-call-ip6tables = 1
EOF

sudo sysctl --system
Next, we’ll enable and start cri-o and the kubelet:
sudo systemctl enable --now cri-o && sudo systemctl enable --now kubelet
Finally, we’re ready to initialize our cluster, using
kubeadm init. Since I’m using cri-o, I need to add--cri-socket=/var/run/crio/crio.sockand since I’m using flannel for networking, I need to include the--pod-network-cidrargument:sudo kubeadm init --pod-network-cidr=10.244.0.0/16 --cri-socket=/var/run/crio/crio.sock
Once the
kubeadm initcommand completes, we need to follow the directions on the screen to create and populate a.kubeconfig directory:mkdir -p $HOME/.kube sudo cp -i /etc/kubernetes/admin.conf $HOME/.kube/config sudo chown $(id -u):$(id -g) $HOME/.kube/config
As I mentioned earlier, I’m using flannel for networking, which requires a
kubectlcommand to set up:kubectl apply -f https://raw.githubusercontent.com/coreos/flannel/master/Documentation/kube-flannel.yml
Also on the networking front, I found during my tests that my Fedora CoreOS host was configuring a
10.88.0.1/16address on thecni0interface, which was conflicting with my flannel networking. I found that if I deleted that address from the device, thecni0interface would get a new,10.244.0.1/24address that worked for my cluster:sudo ip addr del 10.88.0.1/16 dev cni0
If you’re going to run a single all-in-one node, you need to un-taint the master node so it can run pods. If you’re setting up additional nodes, you’ll need to re-run all the steps we’ve gone through above, substituting the final
kubeadm initstep for thekubeadm joincommand that’s printed on screen at the end of theinitoperation. If you’re using cri-o, the additional nodes also need a tacked-on--cri-socket=/var/run/crio/crio.sockargument on thejoincommand.kubectl taint nodes --all node-role.kubernetes.io/master-
To make sure that everything is working properly, we can run a “hello world” deployment on our new cluster and expose the resulting pod via a NodePort service:
kubectl create deployment hello --image=nginx

kubectl expose deployment hello --type NodePort --port=80
Finally, we can find out which NodePort was assigned, and use curl to see that the server is up:
$ kubectl get svc NAME TYPE CLUSTER-IP EXTERNAL-IP PORT(S) AGE hello NodePort 10.110.89.135 <none> 80:31967/TCP 3s kubernetes ClusterIP 10.96.0.1 <none> 443/TCP 2m14s $ curl http://$(hostname):31967 <!DOCTYPE html> <html> <head> <title>Welcome to nginx!</title> <style> body { width: 35em; margin: 0 auto; font-family: Tahoma, Verdana, Arial, sans-serif; } </style> </head> <body> <h1>Welcome to nginx!</h1> <p>If you see this page, the nginx web server is successfully installed and working. Further configuration is required.</p> <p>For online documentation and support please refer to <a href="http://nginx.org/">nginx.org</a>.<br/> Commercial support is available at <a href="http://nginx.com/">nginx.com</a>.</p> <p><em>Thank you for using nginx.</em></p> </body> </html> -
Fedora Atomic Host comes bundled with a version of Docker based on this project atomic repo that moves no faster than the upstream Kubernetes project can abide (currently docker-1.13.1). This means that Fedora Atomic pretty much always ships with an older version of docker than what’s available from Docker Inc.
However, through the magic of rpm-ostree package layering, you can replace that older, baked-in docker with the very latest docker-ce. Here’s how:
First, grab the repo file for docker-ce.
# cd /etc/yum.repos.d/
# curl -O https://download.docker.com/linux/fedora/docker-ce.repo
Then create a config file to tell docker-ce to use overlay2 storage.
# vi /etc/docker/daemon.json

{
  "storage-driver": "overlay2"
}
Then, use
rpm-ostree overrideto remove docker and kubernetes from the image, and userpm-ostree installto layer on docker-ce from the configured repo.# rpm-ostree override remove docker docker-common kubernetes kubernetes-node cockpit-docker # rpm-ostree install docker-ce -r
After the reboot, you’ll have the latest docker-ce installed. Knock yourself out with any number of bleeding-edge features!
# docker info
Containers: 0
 Running: 0
 Paused: 0
 Stopped: 0
Images: 0
Server Version: 17.09.0-ce
Storage Driver: overlay2
...
-
I just came across this Little Guide to Kubernetes Install Options, which covers a few options I’ve heard of, and a few options I haven’t heard of. It doesn’t mention the main way that I deploy Kubernetes, which is through the Ansible scripts from the kubernetes/contrib repository. The post does point to another Ansible-based option, though, and I wondered whether this one, called Kubespray (nee Kargo) would work with Atomic Hosts.
I installed kubespray:
$ sudo pip2 install kubespray
I generated an inventory for a baremetal (actually VMs) cluster with one etcd host / kube master and two nodes:
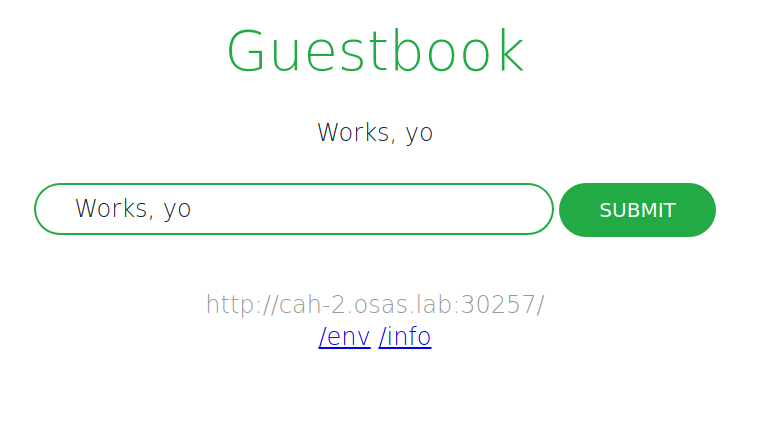
$ kubespray prepare --nodes node2[ansible_ssh_host=cah-2.osas.lab] node3[ansible_ssh_host=cah-3.osas.lab] --etcds node1[ansible_ssh_host=cah-1.osas.lab] --masters node1[ansible_ssh_host=cah-1.osas.lab]
I deployed the cluster, providing the argument
-u rootbecause my ansible host was already set up to access my test VMs as root via ssh key:$ kubespray deploy -u root
The ansible zoomed by, eventually ending with:
PLAY RECAP *********************************************************************
localhost : ok=3 changed=1 unreachable=0 failed=0
node1 : ok=393 changed=95 unreachable=0 failed=0
node2 : ok=333 changed=76 unreachable=0 failed=0
node3 : ok=303 changed=65 unreachable=0 failed=0

Kubernetes deployed successfuly
I tested the cluster by deploying the guestbook go sample app, as is my custom, and sure enough, everything seemed to be working.
The biggest difference between this installation route and the one I usually take is the source of the containers. Where I typically run CentOS Atomic with Kubernetes rpms from the CentOS project or with containers based on those rpms, and the same with Fedora Atomic and Fedora-based content, the Kubespray installer set me up with container images mostly from CoreOS:
[root@cah-1 ~]# atomic containers list
CONTAINER ID IMAGE COMMAND CREATED STATE BACKEND RUNTIME
19d6514ceb1a quay.io/coreos/hyper /hyperkube controlle 2017-08-11 18:54 running docker docker
47bb6f63af38 gcr.io/google_contai /pause 2017-08-11 18:54 running docker docker
2102af0a5915 quay.io/coreos/hyper /hyperkube scheduler 2017-08-11 18:54 running docker docker
8af0c87bcfbd gcr.io/google_contai /pause 2017-08-11 18:54 running docker docker
c91bf4d9c687 quay.io/coreos/hyper /hyperkube apiserver 2017-08-11 18:54 running docker docker
96bc198022ac gcr.io/google_contai /pause 2017-08-11 18:54 running docker docker
e5cedfe5145e calico/node:v1.1.3 start_runit 2017-08-11 18:53 running docker docker
a31b6a04be23 quay.io/coreos/hyper /hyperkube proxy --v 2017-08-11 18:52 running docker docker
877aa10ab6a4 gcr.io/google_contai /pause 2017-08-11 18:52 running docker docker
b9f64835b7e5 quay.io/coreos/hyper ./hyperkube kubelet 2017-08-11 18:52 running docker docker
1bab52292b2d quay.io/coreos/etcd: /usr/local/bin/etcd 2017-08-11 18:48 running docker docker
It’s not a big deal swapping out one container source for another, however. Fedora and CentOS aren’t providing a hyperkube container, which is what kubespray (and kubeadm, for that matter) look to use, but we could create one for Fedora and CentOS based on the upstream Dockerfile.
-
At the end of last week, I spied an exciting tweet about oVirt:

Not long after I started using oVirt and Gluster together, the projects started talking about a way to improve Gluster performance by enabling virtualization hosts to access Gluster volumes directly, using Gluster’s libgfapi, rather than through a FUSE-mounted location on the virtualization host. There was a little bit of fit and finish work to be done, and then we’d all be basking in the glow of ~30% better Gluster storage performance.
That was about four years ago. There ended up being kind of a lot of different little things that needed fixing to make this feature work in oVirt. You can follow many of the twists and turns in bugzilla.
All along, I was eagerly awaiting the feature both as a cool new oVirt+Gluster development and as a welcome option for speeding up my own lab. Disk has always been the weakest part of my hardware setup. My servers each have a single pair of 1TB drives in mirrored RAID, shared between Gluster and the OS, and my VM’s virtual drives had been stored in triplicate in replica 3 Gluster volumes. More recently, with the advent of Gluster arbiter bricks, I’ve been able to get the split-brain protection of replica 3 volumes with only two copies of the data, and that sped things up a bit, but did nothing to dampen my appetite for libgfapi.
Since I need my oVirt setup to get things done, I usually don’t test RC versions of new oVirt components there, but I couldn’t wait any longer and took the plunge. I installed the RC2 updates on each of my virt hosts, and on my engine, I installed a slightly newer versionof the code, from the experimental repo, which contained a few last bits that hadn’t made RC2. Then, on my engine, I ran:
# engine-config -s LibgfApiSupported=true
# systemctl restart ovirt-engine
Any VMs that were already running before the upgrade continued running without libgfapi, and if I migrated them to another host, they’d turn up on that host still using the old access method. When I restarted my VMs, they returned using libgfapi. I could tell which was which by grepping through the qemu processes on a particular VM host.
# ps ax | grep qemu | grep 'file=gluster\|file=/rhev'

-drive file=/rhev/data-center/00000001-0001-0001-0001-00000000025e/616be2b6-71db-4f54-befd-be6a444775d7/images/3f7877e7-e532-44a0-8735-c7b2ca06de3b/48ee34fc-ae12-494c-892f-4229fe1fef9d

-drive file=gluster://10.0.20.1/data/616be2b6-71db-4f54-befd-be6a444775d7/images/6597f45a-51cd-4da5-b078-a2652baf78e4/cc3a575e-27b8-4176-b922-9466273153be
The qemu command lines are super long, so I cut them down just to include the line specifying the virtual drives. In the first example, the drive is being accessed through a FUSE mount, and the second, there’s a direct connection to the Gluster volume.
So, how was performance?
I tried a few different tests, starting with running
ddon one of my VMs:# dd bs=1M count=1024 if=/dev/zero of=test conv=fdatasync && rm test
I ran this a bunch of times on a VM in both storage configurations and the libgfapi configuration came out about 44% faster on average.
For a more “real world” test, I figured I’d measure the time it takes to complete a common task of mine: configuring a test Kubernetes cluster from three Fedora Atomic Host VMs using the upstream ansible scripts. I recorded and averaged the time it took to complete this task across multiple runs on VMs running in each storage configuration, and found that libgfapi was 11% faster.
zram madness
Not too bad, but like I said earlier, my oVirt setup can use all the storage speed help it can get. My servers don’t have a lot of disk but they do have quite a bit of RAM, 256GB apiece, so I’ve long wondered how I could use that RAM to wring more speed out of my setup. For a few months I’ve been experimenting with using Gluster volumes backed by RAM-disks, using zram devices.
This actually works pretty well, and I was seeing speeds similar to what I get running on the SSD in my laptop. Of course, RAM-disks mean losing everything on the disk in the event of a reboot (expected or otherwise), but using replica 3 Gluster volumes, I could reboot one host at a time without losing everything else. Upon bringing back the rebooted host, I’d run a little script to recreate the zram device and the mount points, and then follow the Gluster instructions for replacing a failed brick.
# cat fast.sh
ZRAMSIZE=$((1024 * 1024 * 1024 * 50))
modprobe zram
echo ${ZRAMSIZE} > /sys/class/block/zram0/disksize
mkfs -t xfs /dev/zram0
mkdir -p /gluster-bricks/fast
mount /dev/zram0 /gluster-bricks/fast
mkdir /gluster-bricks/fast/brick
However, if all of my machines went down at once, due to a power failure in the lab or something like that, replication wouldn’t help me. I wondered if I could still get a significant boost out of a mixture of zram and regular disk backed volumes, with each of my servers hosting one zram-backed brick, one regular disk-backed brick, and one regular disk-backed arbiter brick, all combined into one distributed-replicated Gluster volume.
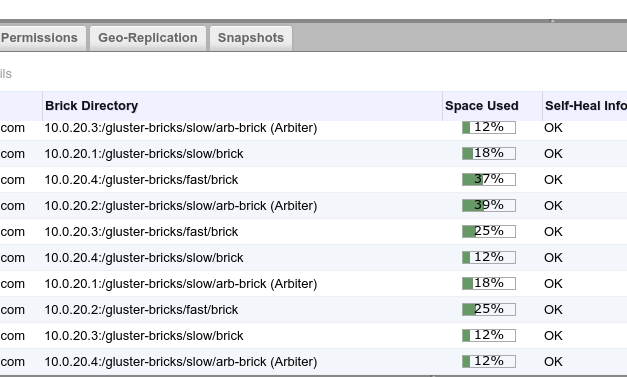
I ran my same ansible-kubernetes setup tests with the VM drives hosted from my “fast” Gluster domain, and the tests run 32% faster than with the my regular disk-backed (and now libgfapi-enabled) “data” storage domain. Pretty nice, and, in this sort of setup, a power loss would mean that each of four replica groups would be missing one brick, with a remaining data brick and an arbiter brick still around to maintain the data and allow me to repair things.
I want to experiment a bit further with automated tiering in Gluster, where I’d connect a RAM-disk boosted volume like this to the volume for my main data domain, and frequently-accessed files would automatically migrate to the faster storage. As it is now, my fast domain has to be relatively small, so I have to budget my use of it.
-
A month or so ago I jotted down some notes on using ansible to set up a kubernetes cluster on atomic hosts with kubernetes running in regular docker containers and flannel and etcd running in system containers.
I’ve been working on turning my kube containers into system containers. Three reasons jump to mind:
- I want to run my kube containers via systemd, and system containers come with systemd unit files rolled in and deployed automatically when you run
atomic install --system foo, as opposed to storing them somewhere separate from the containers, and copying them into place. - I’m using flannel and etcd system containers, in part because flannel needs to modify docker’s configs to do its thing, and etcd needs to be running for flannel to run, so there’s a bit of a chicken-and-egg situation that we avoid by running flannel and etcd outside of docker. I can save on a bit of storage by having flannel, etcd and kubernetes all share the same image in the ostree-based storage that system containers use.
- I’ve been wanting to learn more about system containers for a little while now, and Yu Qi (Jerry) Zhang just wrote this system container howto.
I’ve been testing on a trio of fedora atomic hosts like this:
$ git clone https://github.com/jasonbrooks/contrib.git
$ cd contrib
$ git checkout system-containers
$ cd ansible
$ vi inventory/inventory

[masters]
kube-master-test.example.com

[etcd:children]
masters

[nodes]
kube-minion-test-[1:2].example.com

$ cd scripts
$ ./deploy-cluster.sh
Substitute those hostnames above with ones that match your own test machines. Alternatively, you should be able to use the Vagrantfile in the
vagrantdirectory of that repo, though I haven’t tested that yet.This involves a bunch of changes to run commands like
atomic install --system --name etcd {{ container_registry }}/{{ container_namespace }}/etcd:{{ container_label }}to install flannel, etcd and kubernetes master and node components if desired and specified in theinventory/group_vars/all.ymlfile.In that same config file, I’ve temporarily turned off some of the newish encrypted flannel stuff, because I need to tweak the flannel container to make it work.
If you run the script as laid out above, you’ll get etcd, flannel and kube containers from my namespace in the docker hub, because the current upstream fedora containers, in the case of etcd and flannel, need a couple of changes, and in the case of kube, the upstream fedora containers (that I maintain) aren’t yet modified to run as system containers.
Speaking of which, another cool thing about system containers is that they can be run as regular docker containers. To test whether my new system containers would run as regular docker containers, I ran through the steps I mentioned in my previous post, with a different branch of ansible modded to run kube in regular docker containers, but in the
all.ymlconf file, I setcontainer_registry: docker.ioandcontainer_namespace: jasonbrooksandcontainer_label: fc25to grab the system container versions of everything that I’ve been talking about in this post. It worked.So, yay. I have a couple items to work through still. There’s the flannel bit I mentioned above (I think I just need to mount another dir in the flannel system container’s
config.json.template). Also, I’ve been needing to restart thekubeletservice again in my nodes before thekubednspod would work, so I need to track down where in the ansible that needs to happen to make it automatic. - I want to run my kube containers via systemd, and system containers come with systemd unit files rolled in and deployed automatically when you run
-
A few of the projects I work with use static websites based on middleman, which you can run locally to see how your edits, or those of others, will look on the live site when they’re merged.
Each of these sites defaults to port 4567 when running locally, so if I’m running more than one of them at a time, they complain that their favored port is already taken. It’s easy enough to fire up middleman on a different port, but I thought I’d try and run a couple of these in containers, using a local instance of OpenShift Origin, a Kubernetes-based container application platform.
It’s pretty easy to get up and running with an OpenShift Origin instance using the command
oc cluster up. The oc client is available for Linux, Windows and Mac OS. Since containers (pretty much) are Linux, you’ll need a Linux VM on Mac or Windows, but the oc client can use docker machine to take care of that for you. I haven’t tested that, though, because I use Linux already.On Fedora, I followed these instructions, with the exception of installing the oc client from the Fedora repos (
dnf install -y origin-clients), rather than downloading the binary from GitHub.I wanted my origin install to persist across restarts, so I created a folder in my home directory to store persistent data, and started up my instance with:
$ sudo oc cluster up --host-data-dir=/home/jbrooks/origin-data --use-existing-config
sudowas necessary because I haven’t set up my regular user account to run docker without it — not a big deal, but some config files for logging in to my origin instance as admin ended up in my/rootdirectory instead of my home directory, so I copied those over:$ sudo cp -r /root/.kube ~/. $ sudo chown -R jbrooks:jbrooks ~/.kube
I logged into the OpenShift web console using the URL and the developer:developer user name and password output by the
oc cluster upcommand, clicked “Add to Project”, and then, under the “Languages” heading, chose “Ruby,” and then “Ruby 2.3”, because middleman is a ruby affair.
I filled in a name, pasted in the git repository URL for the ovirt middleman site, and hit “Create.”

I headed to the “Overview” page, saw that my build was running, clicked “View Log,” and saw that a familiar-looking build process was chugging along.

When the build finished, OpenShift kicked off a deployment of my image, which I could see from the deployment log linked from the overview page, was erroring out.
After some poking around, I fixed the issue by heading to the deployments section of the web console and, after first pausing the deployment, hitting the edit YAML button. I used the YAML editor to add a command right in between the image and ports sections of the configuration.

I also changed the containerPort from a default of 8080 to the middleman default of 4567. I expected this change to filter down to the service and route that were automatically created for me, but they didn’t — it wasn’t tough to edit those via the web console, however.
I added
GIT_COMMITTER_NAMEandGIT_COMMITTER_EMAILenvironment variables to my deployment, from an “Environment” tab in the deployments area of the console. As I eventually learned, git got grumpy about running as a random UID (as is OpenShift’s security-conscious custom) rather than as a “real” user with an entry in/etc/passwd, but adding those ENV variables calmed git down.Once I had a pod up and running, I was able to view the development site in my web browser via the URL provided in the routes section of the console.
Next, I headed to my terminal to log into my running pod with OpenShift’s
oc rshcommand, and fetch and check out a pending pull request on the ovirt site:$ oc rsh ovirt-site-2-4-50eao $ git fetch origin pull/877/head:pr-ovirt-gluster-411 $ git checkout pr-ovirt-gluster-411
The middleman development server handles live reloading, so once I checked out the new branch, it refreshed, and I could see my awaiting-merge blog post:

This works, but I’ll probably hone the process some more from here. I experimented a bit with using kompose to put together a simple docker compose-formatted manifest for my app that could either pull from an openshift-built or a built-elsewhere docker container. Like this:
version: "2"

services:
  ovirt-site:
    image: 172.30.24.24:5000/myproject/ovirt-site
    ports:
      - "4567"
    environment:
      - GIT_COMMITTER_NAME="Jason Brooks"
      - GIT_COMMITTER_EMAIL="jbrooks@redhat.com"
    entrypoint:
      - scl
      - enable
      - rh-ruby23
      - /opt/app-root/src/run-server.sh
    labels:
      kompose.service.type: NodePort
I think that that approach would then work for a regular kube cluster or, with some tweaking, probably, docker or docker swarm as well.
